Windows 10: How to fix sluggish performance and boost overall system speed

Several desktop users have reportedly been flooding Microsoft Support forums and Reddit with complaints over sluggish performance issues, after upgrading their systems to Windows 10.
Now, reports suggest that it has been ascertained the slowdowns often show up in the form of unexpected input lags, wherein the Start Menu takes about 2 to 3 seconds to open after clicking on it.
Nevertheless, one user from the Microsoft Community forums has discovered a simple fix pertaining to the Page File settings in Windows 10, which will directly impact the overall system performance.
The trick here is to change the default settings for Page File control from "System Managed" to manual format, wherein you can change the page file memory's initial and maximum size, based on the system memory (RAM) installed on your PC.
Here is a step-by-step guide to speed up Windows 10 on your computer:
- Launch Start Menu and navigate to the Control Panel.
- In the Control Panel, just go to the Search field at the top-right of the window and type Performance. Then hit Enter.
- Once the results popup, just choose "Adjust the appearance and performance of windows." This menu can also be accessed by right-clicking on My Computer and then choosing Properties from the context menu.

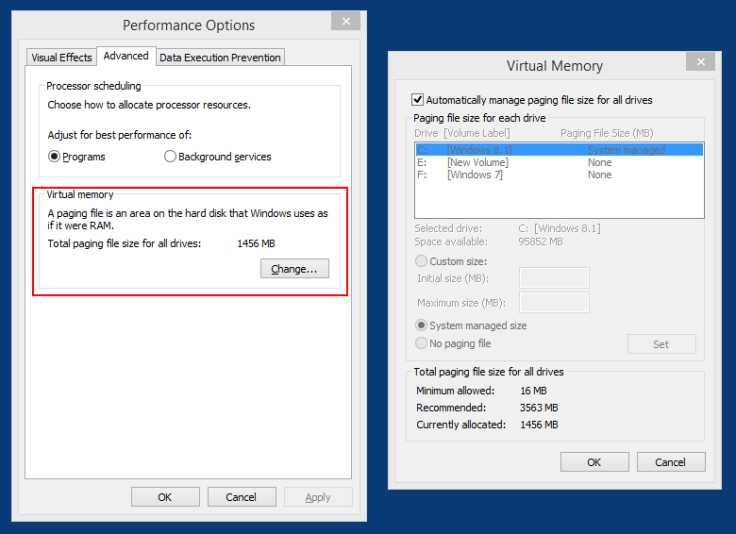
- Go to the Advanced tab and click Change key in the Virtual Memory section.
- Now uncheck the option: "Automatically manage paging file size for all drives."
- Select the drive (default C: drive) where Windows 10 is installed and then choose Custom Size > change Initial Size and Maximum Size to the recommended values by Windows.
- Then click Set and then hit OK to save the settings. Finally, reboot the computer for the changes to take effect.
That's it. Once the computer boots up, you will likely notice a significant boost to the overall system performance minus the unexpected lag you experienced earlier.
[Source: Bidness ETC]
© Copyright IBTimes 2025. All rights reserved.


