iOS 7 Beta: How to Root iPhone 4 Without Jailbreak [Tutorial] [VIDEO]
Unveiled at company's annual WWDC conference, Apple's latest mobile operating system, iOS 7 is currently in its beta stage and is expected to be released as a free software update for iPhone 4 and later, iPad 2 and later, iPad Mini and iPod Touch (fifth generation) in this fall.

Unfortunately, there is no jailbreak available for the iOS 7 beta so far. But those iPhone 4 users who have already installed iOS 7 beta on their devices will be now able to gain root access on their devices, with due credits to root method shared by AppAdvice.
iPhone 4 users who wish to root their devices on iOS 7 beta, may follow our step-by-step guide.
IBTimes UK reminds its readers that it will not be held liable for any damage to the device. Users are also advised to verify that their devices meet following requirements.
Download required applications
MSFTGuy's SSH RAMDisk tool (Windows or Mac)
A binary plist editor (TextWrangler will work for OS X)
Pre-requisites
1) As the tutorial is likely to wipe all data of the device, create a back-up for the same before proceeding.
2) Verify that the iPhone is having above 80 per cent of battery charge.
3) The tutorial is compatible only with iPhone 4 running on iOS 7 beta. Applying this on any incompatible variant is likely to brick the device.
4) This method will not work on any A5+ device.
5) The procedure has been tested successfully on iOS 7 beat 1.
6) This will work on OS X and Windows.
Steps to root iPhone 4 running on iOS 7 Beta
Step-1: Download MSFTGuy's SSH RAMDisk tool
(Ignore it if you have alerady downloaded the tool.)
Step-2: Now place the iPhone 4 into DFU mode
Note: To enter DFU mode, first connect the device to the computer and launch iTunes. Then turn off the device. Now hold the Power button for about three seconds. Hold Home button without releasing the Power button for about 10 seconds. Now release the Power button but keep holding the Home button until get alerted by iTunes saying that it has detected a device in Recovery Mode.
Step-3: If the RAMDisk tool has the init mux error then users need Java 6 update version 35 for 32bit. Also, remove Java 7 for 32bit. Those who are on a 64bit PC should install Java 7 64bit and uninstall the Java 7 32bit
Step-4: Now launch CyberDuck or WinSCP and connect to localhost on port 2022 with users name root and the password alpine
Step-5: Open a terminal window using the SSH connections. Within Terminal type in the command mount.sh and press Enter. If the procedure is successful, then the following should appear next
Mounting / dev / disk0s1s1 on / mnt1
Mounting / dev / disk0s1s1 on / mnt2
Step-6: Within the SSH client, navigate to /mnt1/etc and look for a file named fstab in the folder. Make a copy of fstab on the desktop and change the name of the file on the iPhone to fstab.old
Step-7: Open the fstab file on the desktop using TextEdit or NotePad. Within the file change, / dev / disk0s1s1 / hfs ro 0 1 to / dev / disk0s1s1 / hfs rw 0 1. Now save the file and copy it back to the iPhone with setting permission to 0644
Step-8: Now navigate to / mnt1 / System / Library/ Lockdown and copy the Services.plist file to the desktop. Then change the name of the file on the device to Services.plist.old
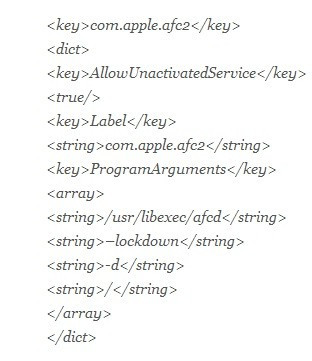
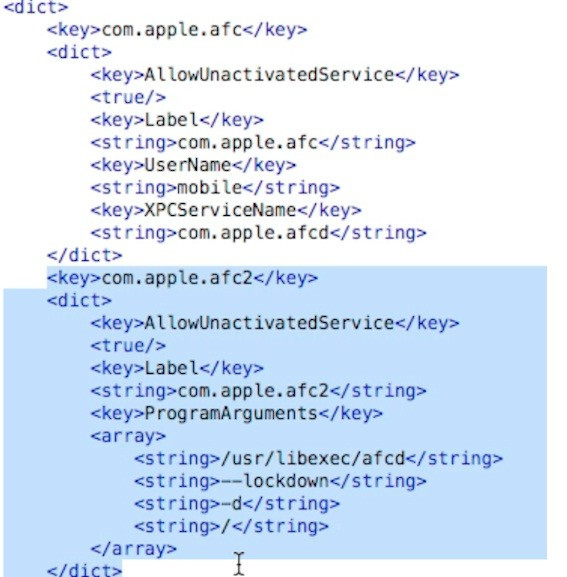
Step-9: Open the Services.plist in the preferred binary plist editor and add the following entries below the com.apple.afc section

Now save the plist file and copy it back to the iPhone with setting permissions to 0644

Step-10: Launch a new terminal window through the SSH client and type halt and then press Enter. The device will turn off and restart in the Recovery Mode
Note: Users might need to manually turn on the device.
Step-11: Launch TinyUmbrella, select the device (iPhone) from the list on the left side of the application and click on Exit Recovery. The iPhone should now restart and boot into iOS 7

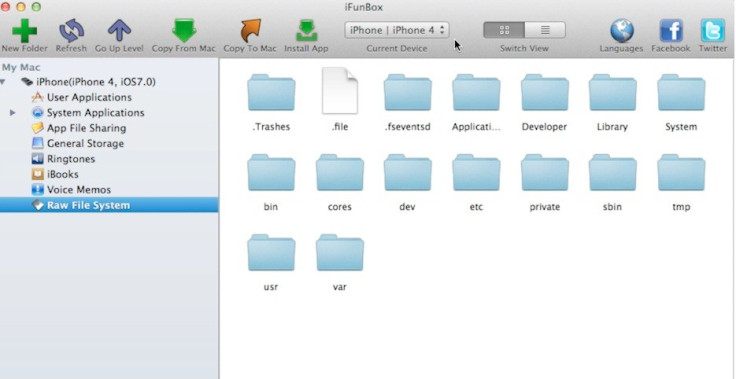
Step-12: Launch iFunBox and check the status of the iPhone on the left side. If jailed is not seen next to iPhone 4 and iOS 7, then it means the process is completed. Users will now have full r/w access to root files on the iPhone 4. But do not play with these files in the root directory which will result in damaging the device. In case something goes wrong, users can restore the device with iTunes
Provided the aforementioned instructions are followed strictly, the iPhone 4 should be now rooted successfully running on iOS 7 beta.
Also read- iOS 7 beta 6: Install without registered UDID or developer account [TUTORIAL]
[Source: AppAdvice]
© Copyright IBTimes 2025. All rights reserved.


