How to untether jailbreak iOS 8.3, 8.2, 8.1.3 on iPhone, iPad and iPod touch with TaiG 2.0

The TaiG team has just announced an untethered jailbreak with support for iOS 8.1.3 – iOS 8.3 for Windows.
Jailbreak fans looking for a method to perform the untether jailbreak may follow our step-by-step guide below. But note that the jailbreak is compatible with the following iOS devices running on iOS 8.1.3, iOS 8.2 and iOS 8.3.
- iPhone 6 Plus, iPhone 6, iPhone 5s, iPhone 5, iPhone 4S
- iPad Air 2, iPad Air, iPad 4, iPad 3, iPad 2
- iPad mini 3, iPad mini 2, iPad mini and iPod touch 5G
Important points
- TaiG jailbreak tool is currently available for Windows only
- TaiG is an untethered jailbreak version
- Do create a backup using iCloud or, iTunes before you start the jailbreak process, which might wipe out all data of your iOS device
- If you get warning saying Storage Almost Full, run Cydia
- If the jailbreak process fails, turn off Wi-Fi and try again. If that does not work too, then use TaiG Pro to restore and try to jailbreak again
- Ensure that your iOS device has 80% battery
- TaiG jailbreak v2.0.0 supports iOS 8.1.3- iOS 8.3. If you have not done so already, update your iOS device to iOS 8.3 with TaiG Pro before jailbreak
- IBTimes UK will not be held responsible for any damage to the device.
How to untether jailbreak iOS 8.1.3-iOS 8.3 on iPhone, iPad and iPod touch with TaiG v2.0.0
Step-1: Download TaiG untethered jailbreak v2.0.0 tool on your PC
Step-2: Connect your iOS device to the PC using USB cable
Step-3: Go to Settings>> Passcode>> enter your Passcode>> Turn Passcode off>> enter Passcode
Step-4: Turn off Find My iPhone from Settings>> iCloud>> Find My iPhone
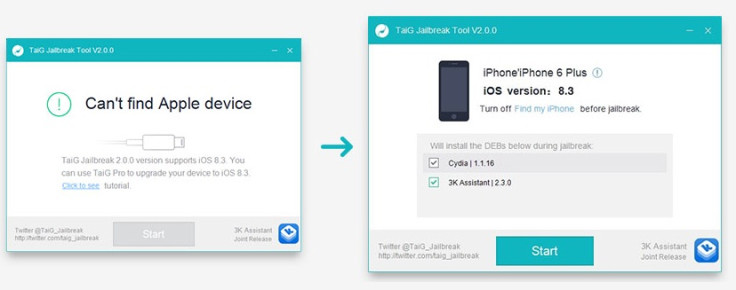
Step-5: Launch TaiG jailbreak application as an Administrator while your iOS device is connected to the PC. Right-click on the TaiG exe and select Run as Administrator from the drop-down menu
Step-6: Wait until TaiG detects your iOS device. When it shows your device with the correct firmware version, uncheck 3K Assistan, which is just below Cydia 1.1.16

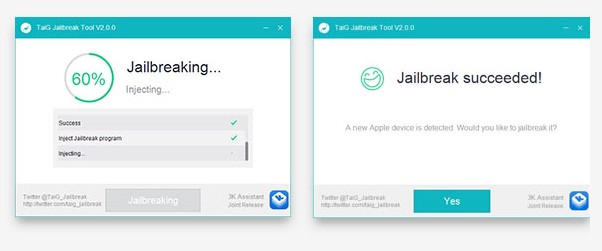
Step-7: Click Start button to jailbreak. You should see a circular progress bar. Wait patiently for the process to complete

Step-8: When the jailbreak is completed, your device will reboot automatically. A message will appear saying 'Jailbreak succeeded'. You should see the Cydia icon on your device's home screen
After the jailbreak is completed, do not forget to re-enable the Passcode and Find My iPhone features.
In case you come across issues with the jailbreak, click here to get help for troubleshooting issues.
Source: TaiG
© Copyright IBTimes 2025. All rights reserved.


