How to Fix 'Error: Update Package Missing System.img' with Android 5.0 Factory Images for Nexus Devices

Several Nexus device users are reportedly flooding forums and social networking sites with complaints about an error in Google's batch script file that is failing the installation of Android 5.0 Lollipop factory images on Nexus devices.
The error message reads: "error: update package missing system.img", when users try flashing the Lollipop factory image via flash-all.bat file, as the command window reportedly fails to install or recognise the factory image.
Nevertheless, Nexus device owners can resolve this issue by flashing files manually or without using the batch script file in the factory image.
Earlier, Google's Conley Owens acknowledged this issue and suggested the use of latest Fastboot files from SDK. But, this workaround did not seem to fix the issue.
Here is what Conley had to say about the issue and proposed workaround:
We're hearing from users who are getting a "missing system.img" error when trying to flash a device. If you are seeing this issue, please use the latest fastboot.
You can get it from the SDK at https://developer.android.com/studio or you can build it in the AOSP source tree by running 'make fastboot'.
IBTimes UK reminds readers that it will not be held liable for any damage to devices while following the instructions provided in this guide. Users are advised to proceed at their own risk.
Steps to Install Android 5.0 Lollipop Factory Image Manually on Compatible Nexus Devices
- Provided you have already extracted the factory image, locate the image-xxx-xxx.zip file inside the factory image.
- Unzip or extract the image-xxx-xxx.zip file to a desired folder on your computer to get the following files:
- boot.img
- cache.img
- recovery.img
- system.img
- userdata.img
- system.img
3. Copy/paste the bootloader and radio image files from the factory image to the folder where you extracted files in Step 2 above.
4. [Skip this step if you already have a working adb/fastboot setup] Copy/paste the contents from adb_and_fastboot_files.zip file to the same folder again from Step 2.
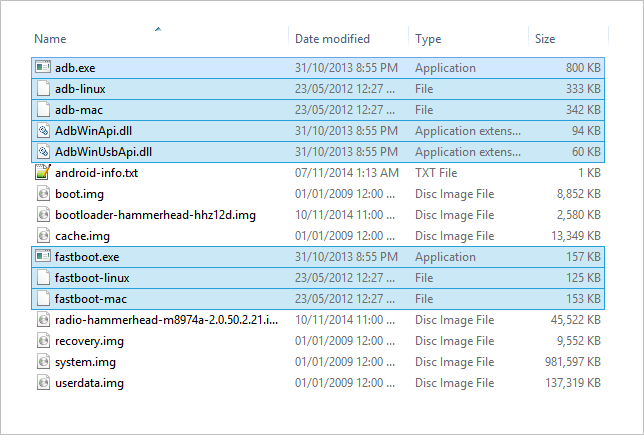
5. Open the folder where all the files are located, it should look like this:

6. If you skipped Step 4, ensure all the files are present in the folder except for the highlighted files in the screenshot above.
7. Launch a command window by holding shift and right-clicking inside the folder where the files are present. Then select "Open command window here" from the context menu.
8. Now type in the following commands one by one and press enter to install/flash Android 5.0 Lollipop factory image manually on your Nexus device:
- fastboot flash bootloader bootloader.img
Note #1: Use the file name of bootloader image instead of bootloader.img. For instance, Nexus 5's bootloader will have the name "bootloader-hammerhead-hhz12d.img".
fastboot flash radio radio.img
Note #2: Use the file name of your radio image. For Nexus 5, it's "radio-hammerhead-m8974a-2.0.50.2.21.img".
- fastboot reboot-bootloader
- fastboot flash recovery recovery.img
- fastboot flash boot boot.img
- fastboot flash system system.img
9. Wait until the system.img file installs completely, as it's the biggest file of all.
10. Once system.img is flashed successfully, reboot your device by entering the following command:
- fastboot reboot
Your device will now reboot with the newest Android update, Android 5.0 Lollipop. As this is your device's first boot on Android 5.0, it may take longer than expected. So, please be patient.
[Source: The Android Soul]
© Copyright IBTimes 2025. All rights reserved.


